In this post I will explain how to precisely, efficiently and quickly steer a bicycle. Steering a bicycle might sound obvious to any (experienced) cyclist, but some concepts and techniques that come intuitively, especially “countersteering”, are better used when one knows about them and tries consciously to practice and improve them.
As a kid, I understood the effect as if bicycle needs a bit of a “running start” in order to turn more quickly, just like I needed to crunch down a bit in order to jump further. 🙂
Table Of Contents (T.O.C.):
- Active balance (physics)
1.1. Centre of mass
1.2. Fulcrum
1.3. Balance - Bicycle balance
2.1. Gravity and centrifugal force - Turning (with) a bicycle
- Countersteering
1. Physics of bicycle steering – active balance
Since I think it is better to understand how something works, than learn by heart, I’ll start from the basic concept of active balance. The first thing one notices when riding a two wheeled vehicle is the need to actively maintain balance, all the time. The lower the speed, the harder it is to keep balance, requiring more skill and concentration.
In order to explain the concept of active balance, I will first explain two important terms: centre of mass and fulcrum.
1.1. Centre of mass
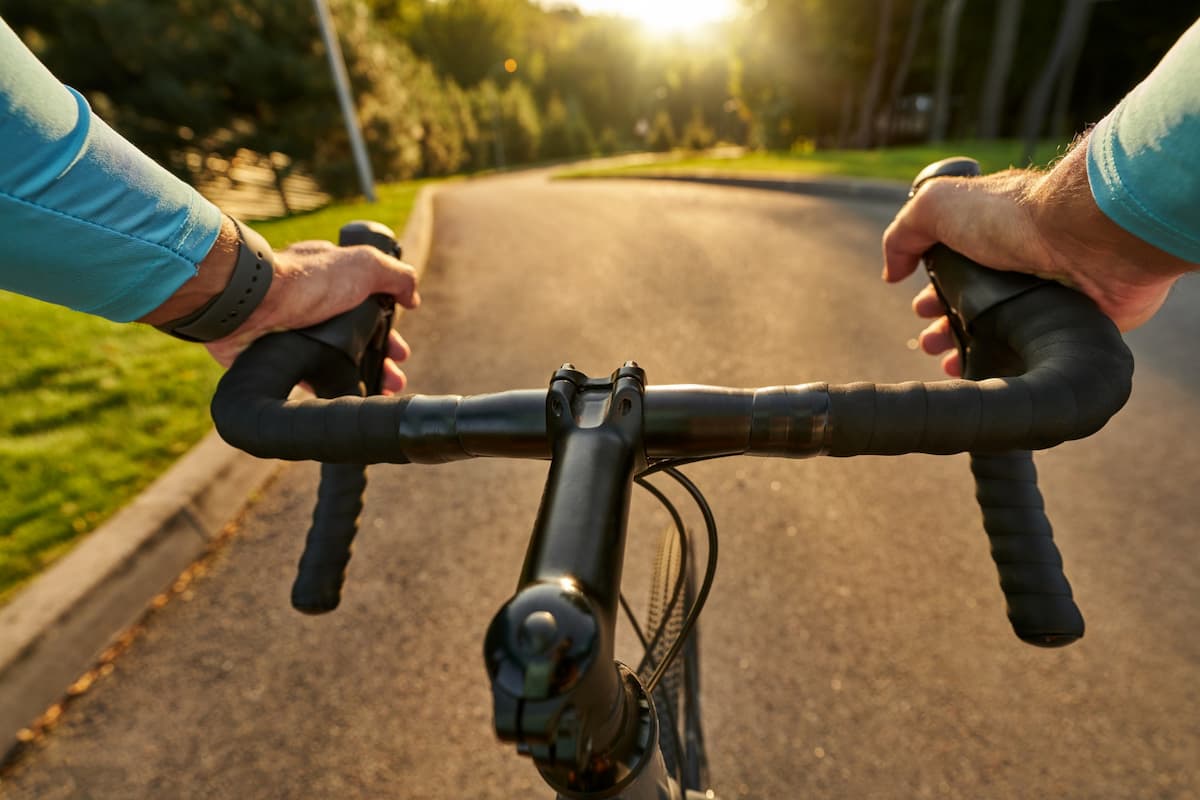
Centre of mass of an object is a point in which all the weight of the object is concentrated. Exact position of this point depends on object’s shape and mass distribution. Picture 1 shows centres of mass for various object shapes:
Picture 1
1.2. Fulcrum
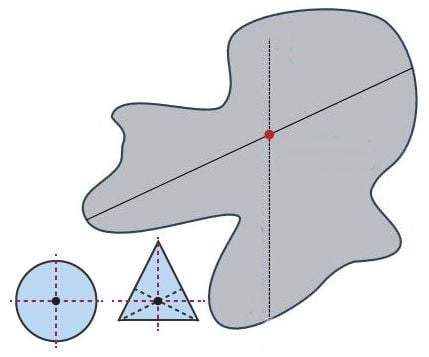
Fulcrum (or an anchor point) is a point on which an object’s mass is leaned, anchored, or pivots around. An example is shown in picture 2.
Wrench is the body.
Picture 2
As it is shown in picture 2, changing fulcrum position, or object’s centre of mass (by placing a coin in this picture), the balance changes, as will be explained in the next chapter.
1.3. Balance
One more term to explain, before explaining (active) balance. It is the “balance point“. Balance point is the relative position of object’s centre of mass and it’s fulcrum, from the gravity (and centrifugal force, as I’ll explain later) pull axis. If the fulcrum is directly beneath the centre of mass, an object is in balance. If the fulcrum is moved to one side, the balance point moves to the opposite side, causing the object to lean/fall to the side where the balance point is moved.
For example, moving a fulcrum to the left, causes the balance point to move to the right, tipping the object to the right. The same goes for any direction. The more a fulcrum is moved to one side, the more the balance point moves to the opposite side, and the object leans more (quickly), pulled by the gravity.
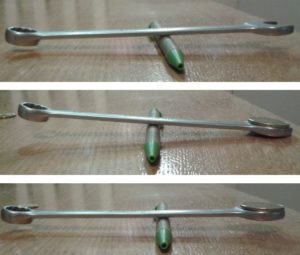
This might sound a bit complicated, but it is very simply explained with an example of active balance: balancing a hammer on a palm, with it’s head upwards (picture 3).
Picture 3
While hammer from the picture 3 stays perfectly vertically, it’s fulcrum (the palm) is exactly beneath it’s centre of mass. Hence, balance point aligns with the fulcrum and the hammer is in balance.
If the hammer starts leaning to the left, for example, the palm needs to be moved to the left too, beneath the, now moved, centre of mass, to keep the hammer in balance. To whichever side the hammer starts dropping, palm needs to be moved to that side, beneath the centre of mass, in order to keep the hammer in balance. This experiment is best tried on a grass field, at least until it is well practised. 🙂
If you want to make the hammer drop to the left, quickly move the palm to the right, and watch the hammer’s head lean and drop to the left. This works in any direction – palm is moved in the opposite direction from which hammer drop/lean is desired.
If walking (slowly) while balancing a hammer on a palm, movement, even the wind, would cause the hammer to always move. Active balance means not static – having to move the fulcrum (palm in this example) in order to achieve and maintain balance.
2. Bicycle balance
Now I’ve explained the concept of active balance, let’s see how it works on a bicycle and why it is important. Similarly to the palm and hammer from paragraph 1.3, bicycle too has a “tool” that enables moving the fulcrum and keeping the bicycle in balance. That tool is the steerer, fork to be exact.
Bicycle fork is always at an angle, it is never (completely, 90 degrees) vertical (picture 4).

Picture 4
The fork angle is not for stylish purposes, but has an important role. It enables movement of the fulcrum (like when balancing a hammer on a palm) and balance maintenance. How is it done? When bars are turned to the right, the front wheel’s contact point is also moved to the right. This moves the fulcrum to that side as well. Effect of moving the steerer is shown in picture 5:
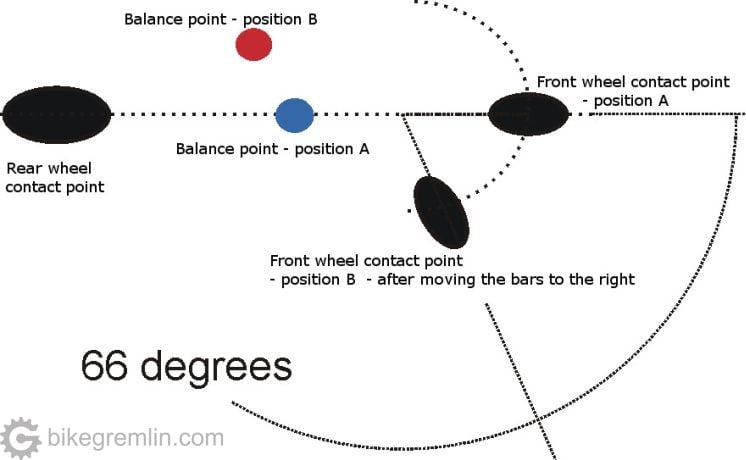
Picture 5
As can be seen in picture 5, moving bars (fulcrum) to the right, moves the balance point to the opposite side (to the left). This forces the bicycle to lean to the left and is the basic principle on which counter steering works, as I’ll explain later.
2.1. Gravity and centrifugal force
In previous examples, only the force of gravity was considered. To simplify: the force of gravity is constantly present, pulling all the objects to the ground. While a bicycle is moving, at any speed, as soon as it starts turning, it is also affected by centrifugal force.

Picture 6
Centrifugal force tries to return an object to the straight moving trajectory. The tighter a turn is and the greater a moving speed is, the stronger is the centrifugal force. When the resulting force of gravity and centrifugal forces is aligned with the fulcrum (tyre contact point), a leaned bicycle in a turn is also in balance.
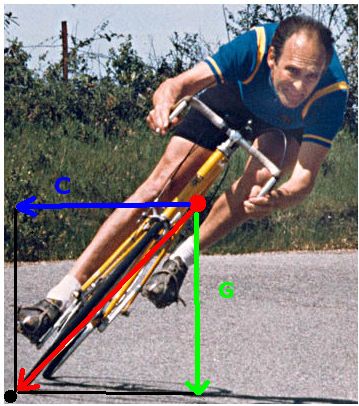
C – centrifugal force
Red dot – centre of mass
Black dot – fulcrum i.e. front tyre contact point
Picture 7
As it is shown in picture 7, when a resulting vector of gravity and centrifugal force aligns with the fulcrum (front tyre contact patch), the bicycle is in balance while leaned – not straightening up, nor falling.
The rider in picture 7 (late Jobst Brandt) has moved his body a bit to the inside of the turn and weighed the (outside) pedal at 6 o’clock. This results in lowering the centre of mass and moving it to the inside of the turn a bit. Without going too much into details – lower centre of mass makes for more stable steering, and centre of mass on the inside of a turn enables for less lean angle for the same speed and turn radius.
If speed is increased, centrifugal force will increase, so bicycle needs to be leaned more to remain in balance – and vice-versa – lower speed requires less of a lean angle.
The same goes for turning radius (i.e. corner sharpness). At a constant speed, the tighter one wants to turn, the more they must lean the bicycle to keep it in balance – and vice-versa.
Look at the picture 7 and try to imagine, if the bicycle was less leaned, how much a rider would have to lean the body into the corner, to move the centre of mass enough to keep the bicycle in balance. Leaning the body can compensate for leaning the bicycle – but only a little, and at lower speeds (weaker centrifugal force). At any greater speed, nothing can replace leaning the bicycle in order to maintain balance!
3. Turning (with) a bicycle
Before I explain countersteering, I’ll first explain how exactly a bicycle is turned. A common misconception is that bicycle turns (only) because the steerer (and the front wheel) is turned to where one wants to go. The fact is that bicycle turns much more quickly and effectively by leaning too. To be precise, a bicycle can be turned without leaning, by just moving the bars, but only at very low speeds and by leaning the body into the turn, in order to compensate for the effect of centrifugal force. Again, imagine the required lean of the rider in picture 7 if the bicycle was completely straight, with just the bars turned (further moving the fulcrum to the inside and balance point to the outside! – as shown in picture 5). The cyclist would have to be so heavy and lean so far inward, to “overcome” both the centrifugal force and the movement of the balance point to the outside of the path of turning.
Only when leaning, the bicycle can be turned effectively. In addition to negating the centrifugal force, lean angle, because of the bicycle tyre round profile and a flat contact patch with the ground, also helps the tyres follow the turn and helps the steering. That is shown in the picture 8:
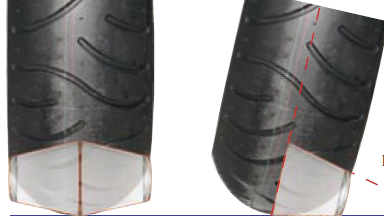
Right – when leaned, because the tyres are curved, a wheel behaves like a rolling cone.
Picture 8
The more a wheel is leaned, the greater is the angle of the cone (that the tyre practically emulates) – hence, the tighter the turn radius. Because of these effects, bicycle can be turned easily at higher speeds. Lean angle both compensates for stronger centrifugal forces and helps the bicycle to turn.
4. Countersteering
“We are all agreed that your theory is crazy. The question that divides us is whether it is crazy enough to have a chance of being correct.”
– Niels Bohr
The principle of countersteering is simple: to turn left, move the bars to the right! 🙂 Bicycle will quickly lean to the left and then you can straighten the bars and turn them to follow the desired turning radius. The opposite goes for turning right, of course.
- In chapter 3 I explained that bicycle is most quickly and efficiently turned by leaning it.
- In chapter 2 I explained how lean is important for keeping the balance in a turn.
- In chapter 1 – how an object can be leaned to a side by moving it’s fulcrum (anchor point).
This was all important in order to understand how and why countersteering works. What happens when you move bars to the right?
- Fulcrum (anchor point) moves to the right (because of the fork angle, front wheel contact point moves left-right, in accordance to bars rotation).
- Centre of mass remains the same (unless the rider deliberately leans the body at the time, but that too only has a limited effect).
- Balance point is moved to the left and causes the bicycle to lean to the left.
The effect is amplified by the fact that the front wheel is, at the moment of (counter)steering, turned a bit sideways relative to the direction of travel. With motorcycles, because of a greater mass of the front wheel, at very high speeds this is all further amplified by gyroscopic effect.
Once a centrifugal force (caused by turning) and the force of gravity are equalized, a bicycle stays balanced in a turn. The more and the quicker the bars are turned to one side – the faster and further the bicycle leans to the opposite side.
Countersteering is a technique that all the cyclists use, but many are not aware of it. Pushing the left bar away, and pulling the right bar towards oneself, the bicycle will quickly turn to the left – in the direction opposite to where the bars and the wheel are turned!
Rear wheel track is shown with a dotted line.
Picture 9
Picture 9 shows wheel tracks when turning left (and the opposite goes for turning right of course, principle is the same). Leaning (and turning) of the bicycle is initiated by moving the bars to the right, when the front wheel swerves a bit to the right. After the bicycle is leaned, the front wheel is aligned to follow the (desired) turn radius.
This can be simply tested by riding through a puddle on a pavement. While the wheels are still wet, make a sharp turn to any side. Stop, turn around, and look at the tracks the wheels have left on the pavement. Do the tracks resemble those in the picture 9?
Countersteering always works, at any speed, in straight or turn. In fact, it is the only way of maintaining balance on a bicycle and steering it effectively. Even while a bicycle is leaned in a turn, turning the bars in the opposite direction will further lean the bicycle more, allowing an even tighter turning. And the opposite – while a bicycle is leaned, turning the bars more into the corner will quickly straighten the bicycle. To maintain a desired turn radius and lean angle, just leave the front wheel turned to follow the turn radius. Bicycle will practically do this on it’s own, unless it is given a different input by the rider (turning bars).
If you don’t believe it, find an old bicycle, weld the steerer so it can’t be turned and try riding it (on grass, with protective clothing in case of a most probable fall). Bike will be harder to lean to any side, with just moving the body, moving bars in the opposite direction results in a much quicker and more controlled leaning. Once the bike is leaned, it will be impossible to prevent it from leaning further, eventually falling – because in order to maintain an achieved lean angle, bars need to be turned into the turn so the front wheel follows the turn radius.
The following pictures are with motorcycle, but principle is the same and countersteering works on all the two wheeled vehicles:
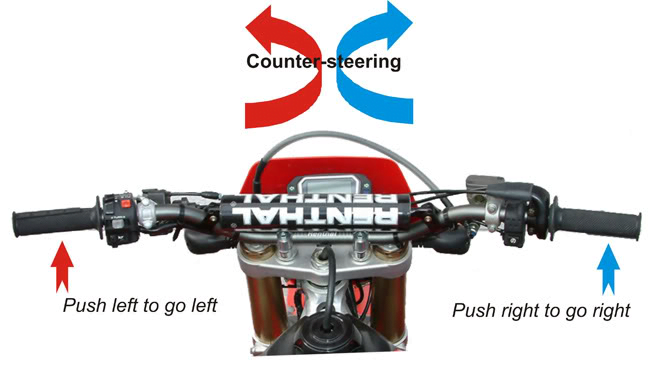
Picture 10
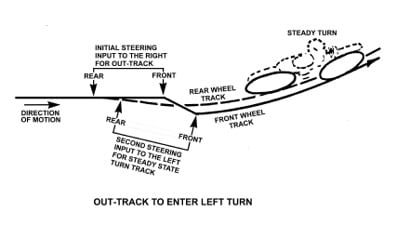
Red and blue twisted arrows roughly show the trajectory of the front wheel. It will first move to the direction where the bars are turned, then, when the bike is leaned, the bars are straightened and the wheel follows the turn radius.
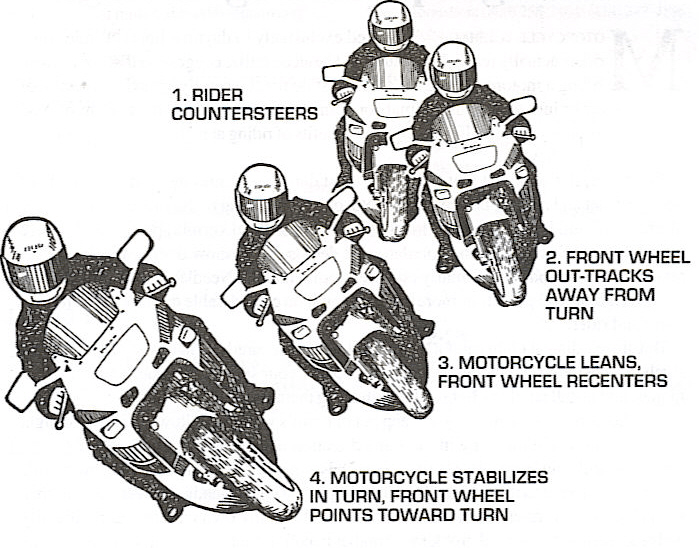
First the wheel is turned to one side, then, after the bike leans into the turn, the bars are straightened and the front wheel follows the turn radius.
Picture 11
Counersteering is something all the riders use practically all the time. However, knowing how it works and consciously using it can take bike control on a higher level. After it is consciously practised for a while, it too becomes instinctive and intuitive. Why is this important?
Besides better control, in risky situations effective use of countersteering is crucial:
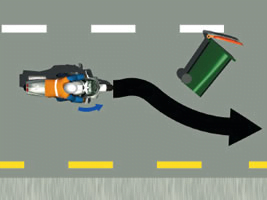
An obstacle suddenly appears on the left. The bars are turned to the left, bike quickly leans to the right, avoiding the obstacle.
Picture 12
Also, at higher speeds, or with a heavily loaded bicycle, consciously using countersteering helps control the bike better.
In the end, I can say: practice countersteering. You will master the control of your bicycle and it comes very handy in risky situations.
To learn/improve riding and cornering read: Fast bicycle cornering.
This is one of the best articles I read about cornering. Thank you!